Revelation 2 – 5
Some general information and considerations on the various ways the book of Revelation can be interpreted:
1. Preterist View.
John is writing to encourage Christians in his own day who are experiencing persecution from the Roman Empire.
Challenge: To gain the same kind of encouragement John’s first readers gained from the vivid images of God’s sovereignty.
Caution: Do not forget that most biblical prophecy has both an immediate and a future application.
- Futurist View:
Except for the first three chapters, John is describing events that will occur at the end of history.
Challenge: To see in contemporary events many of the characteristics John describes and realize that the end could come at any time.
Caution: Do not assume that we have “figured out” the future, since Jesus said that no one will know the day of his return before it happens.
- Historicist View:
The book of revelation is a presentation of history from John’s day until the second coming of Christ and beyond.
Challenge: To note the consistency of human evil throughout history and recognize that names may change but the rebellion against God has not.
Caution: Be careful before identifying current events or leaders as fulfilling aspects of the book of Revelation.
- Idealist View:
The book of revelation is a symbolic representation of the continual struggle of good and evil. It does not refer to any particular historical events. It is applicable at any point in history.
Challenge: To gain insight into the past, to prepare for the future, and to live obediently and confidently in the present.
Caution: Do not avoid the book because it is difficult. Try to understand Revelation within its broader literary context.”
(Life Application Study Bible)
Revelation 2-3
Seven Churches on earth; Seven messages.
Seven letters to the churches in Asia Minor:
“The seven messages follow a similar pattern, in differing order: Each begins with a description of Jesus… Next comes performance review…” Works” set a standard by which the churches are measured. Four churches are told to repent, and five churches experience sharp rebuke… The call to “hear” resembles Jesus’ call in the Gospels (Matt. 11:15; Mark 4:9, 23; Luke 8:8). Finally, comes a wondrous promise from the Spirit to the “Conquerors”. . . Motivating hearers to remain faithful, so they can “conquer” as Jesus conquered.” (Amer, p 724)
Revelation 2
The Message to the Church in Ephesus.
“Ephesus was the capital of Asia Minor, a center of land and sea trade. The temple of Artemis, one of the ancient wonders of the world, was located in this city, and a major industry was the manufacture of images of this goddess (see Acts 19:21-41)”. (Life Application Study Bible)
The church in Ephesus was a backsliding church. Once on fire for Christ, but now becoming indifferent. “They are praised for “resisting” and they “did not endure false teachers, who are called “evil ones.” Indeed, they labored diligently to hold fast the Faith which was given them (Cf. 2 Thess. 2:15).” (2)
Interesting imagery:
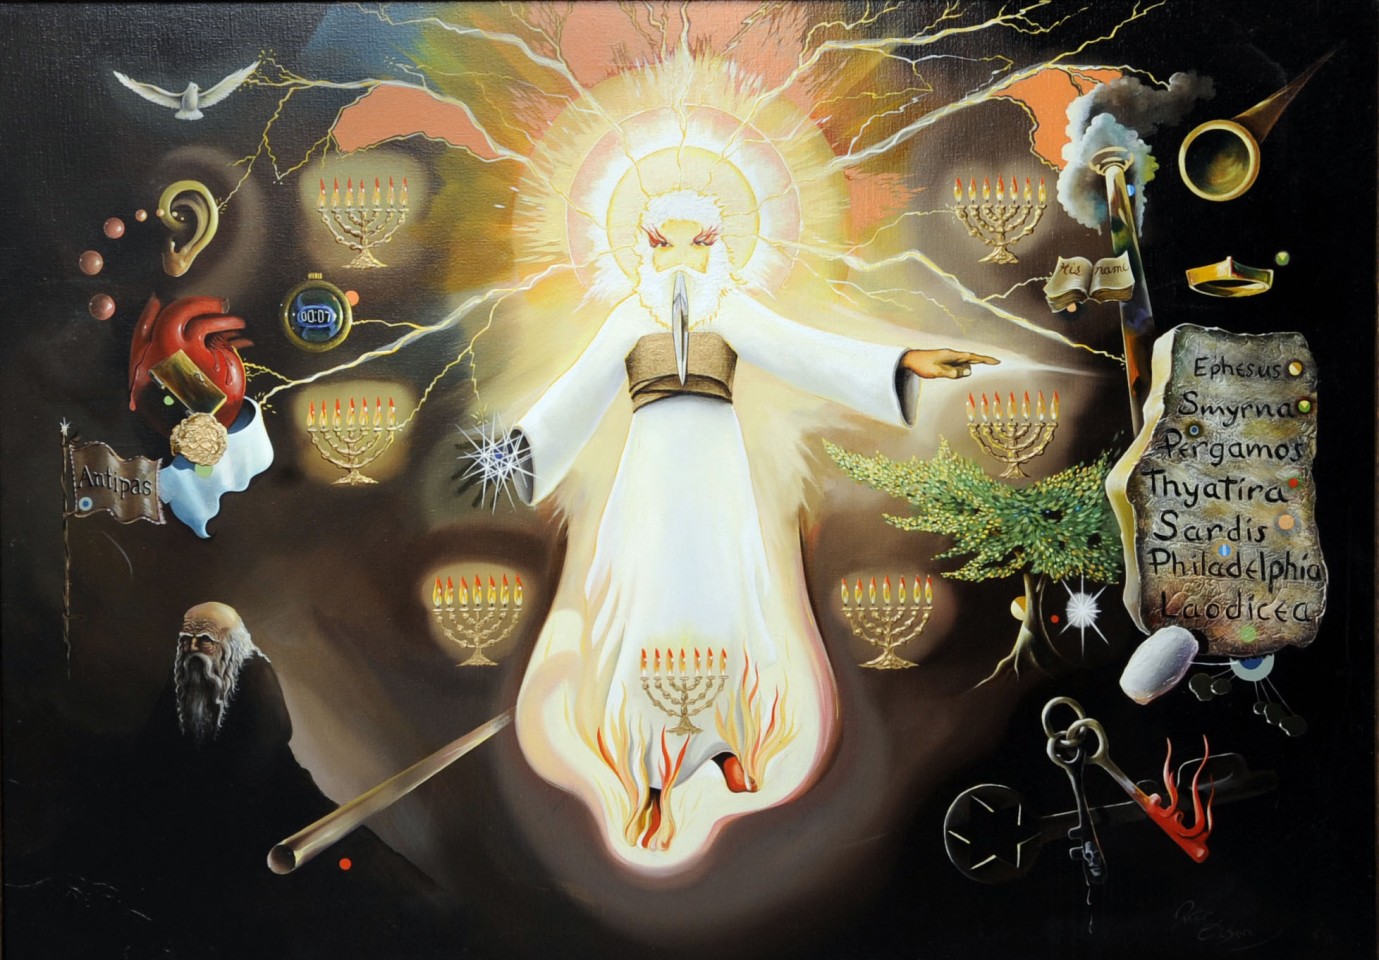
“This is a message from the one who holds the seven stars in his right hand, the one who walks among the seven gold lamp stands” (Rev. 2:1 NLT)
Jesus is the one that walks among the seven gold lamp stands (the seven churches). It is he who holds the seven stars in his right hand (the messengers of the churches). In 2:5 He says “that he will come and remove your lamp stand from its place among the churches” (NLT) — That “would mean the church would cease to be an effective church.” (Life Application Study Bible). Note that he does not say that the light would be extinguished, just the lamp stand (lamp stand, candlestick, menorah) removed. So the light would remain and the lighted lamp stand could be returned.
The Message to the Church in Smyrna.
“The city of Smyrna was about 25 miles north of Ephesus. It was nicknamed “Port of Asia” because it had an excellent harbor on the Aegean Sea. The church in this city struggled against two hostile forces: a Jewish population strongly opposed to Christianity, and a non-Jewish population that were loyal to Rome a supported emperor worship. Persecution and suffering were inevitable in an environment like this.” (Life Application Study Bible)
The church in Smyrna was a steadfast church. [They] were persecuted, poor, but ever faithful and resolute! The church received only praise.
“The messages to Smyrna and Philadelphia introduce the difficult question of the relationship of the churches to Judaism.” (Amer, p 725)
“I know the blasphemy of those opposing you. They say they are Jews, but they are not, because their synagogue belongs to Satan.” – Revelation 2:5 (NLT)
A Jewish perspective on “synagogue of Satan”:
This image from the New Testament has been used for centuries to endorse the idea that Jewish synagogues and Judaism are from the devil. It has also contributed to the deep divisions and disunity between the church and synagogue. How should we understand this fateful portrayal, and what does the apostle mean by it?
As happens all too often, verses like this are taken out of context (especially about Israel and the Jews), and used in ways that they were never intended. A simple reading of the passage shows that this image is not about Jews or Judaism, but was used by John as a jarring image to warn the early Messianic community about a first century group “calling themselves Jews.” (3)
Additional discussion of “synagogue of Satan”:
The word synagogue comes from a Greek word meaning “assembly of men” or “congregation,” and it was used much like the English word “church.” The “synagogue of Satan,” then, is an assembly or congregation—a church—made up of the individuals who “say they are Jews, and are not.” The term “Jew” is used here in a spiritual sense.
Notice the apostle Paul’s definition of a spiritual Jew in Romans 2:29: “He is a Jew who is one inwardly, and circumcision is that of the heart, in the Spirit, and not in the letter; whose praise is not from men but from God.” In this case, it is not one’s physical race that counts, but his spiritual condition (Galatians 3:27-29; Romans 4:16). True Christians are spiritual Jews because Jesus says in John 4:22, “Salvation is of the Jews.”
Those in the “synagogue of Satan” say they are spiritual Jews—pretend to be real Christians—but are not. This false church was already developing in the days of the apostle John, masquerading as God’s true church. It had congregations in the cities of Smyrna and Philadelphia in Asia Minor even at that early time. It and its daughter churches are further described in Revelation 17. (4)
The Message to the Church in Pergamum.
The city of Pergamum was built on a hill 1,000 feet above the surrounding countryside, creating a natural fortress. It was a sophisticated city, a center of Greek culture and education, with a 200,000-volume library. But it was also the center of four cults, and it rivaled Ephesus in its worship of idols. The city’s chief god was Asclepius, who is a symbol was a serpent and who was considered the god of healing. People came to Pergamum from all over the world to seek healing from this god. (Life Application Study Bible)
Pergamum was a licentious (lacking in moral restraints) church. [It was] permissive, sheltering false teachers, following false doctrines. The church was praised for remaining loyal.
The message to Pergamum . . . Brings up two issues that also concern Thyatira: eating food offered to idols and participating in “fornication” . . . Probably a metaphor for participation in the imperial cult. Food was a divisive issue for early Christians, as evidence by the many New Testament debate about eating meat offered to idols (Rom. 14:13-23; 1 Cor. 1023-33). John’s strict vegetarian line prohibiting all meat sacrificed to pagan gods in the city markets would have meant social marginalization, especially for wealthier Christians seeking to move up socially by participating in civic banquets. (Amer, p 725)
Rev. 2:13-15 The church was praised for remaining loyal. It was not easy to be a Christian in Pergamum. Believers experienced great pressure to compromise or leave the faith. Nothing is known about Antipas except that he did not compromise. He was faithful, and he died for his faith. Apparently, however, some in the church were tolerating those who taught or practiced what Christ opposed. (Life Application Bible)
Interesting imagery:
Sharp two-edged sword.
A message from Jesus “from the one with the sharp two-edged sword:” – Revelation 2:12 (NLT)
“Just as the Romans used their swords for authority and judgement, Jesus’ sharp two-edged sword represents God’s ultimate authority and judgement. It may also represent God’s future separation of believers from unbelievers. Unbelievers cannot experience the eternal rewards of living in God’s Kingdom.” (Life Application Study Bible)
This is another example of Jesus defining who He is. The two-edged sword is previously noted to be in Christ’s possession in Revelation 1:16b …and out of His mouth came a sharp two-edged sword… (5)
The word of God preached also is compared to a two-edged sword. (Ephesians 6:17 and Hebrews 4:12).
Hidden manna, white stones, a new name.
From Rev. 2:17, “To everyone who is victorious I will give some of the manna that has been hidden away in heaven. And I will give to each one a white stone, and on the stone will be engraved a new name that no one understands except the one who receives it.” (NLT)
The three blessings are hidden manna, a white stone, and a new name. The precise explanation of these three items is disputed; however, all three blessings must concern the believer’s victorious reign with Christ, consistent with the blessings bestowed on the other six churches of Revelation 2–3. (6)
The “hidden manna” is likely an allusion to the manna hidden in the Ark of the Covenant, representative of God’s faithful presence and sustenance. (6)
Another take on the hidden manna associates it with the Holy Eucharist – Christ’s food for his Church, the people of the New Covenant. “Just as the ancient manna sustained the ancient Jews in their journey through the desert, so now Christ, our true and perfect manna, sustains us on our journey through the desert of this world to the Promised Land of Heaven. Why is this manna, who is Christ, called hidden? It is hidden because its truth is accessed and seen only through faith. To the worldly, the Eucharist seems nothing more than a wafer and some wine, but to the faithful, Christ is seen, whole and entire. [This] hidden manna, Christ Himself, is given to us! Though hidden to earthly eyes, His true presence is grasped through faith. (7)
The white stones and new name:
One of the better-accepted explanations of the white stone has to do with the high priest’s breastplate, which contained twelve stones. Each of these stones had the name of one of the twelve tribes of Israel engraved on it (Exodus 28:21). As he ministered in the temple, the high priest bore the names of God’s people into God’s presence. In the same way, the “white stone” with the believer’s name written on it could be a reference to our standing in God’s presence.
Another widely held explanation suggests that the white stone may be a translucent precious stone such as a diamond. The word translated “white” in Revelation 2:17 is leukos and can also mean “brilliant, bright.” This interpretation holds that on the stone is written the name of Christ, not the name of the believer. Revelation mentions that the name of Christ is written on the foreheads of the saints (Revelation 3:12; Revelation 14:1, and Revelation 14:20). (8)
A bit more information on …the Greek word is λευκός (leukos), [it] means lightsome, bright, shining, or dazzling. One might think of a shining pearl or diamond. (7)
The best theory regarding the meaning of the white stone probably has to do with the ancient Roman custom of awarding white stones to the victors of athletic games. The winner of a contest was awarded a white stone with his name inscribed on it. This served as his “ticket” to a special awards banquet. According to this view, Jesus promises the overcomers entrance to the eternal victory celebration in heaven. The “new name” most likely refers to the Holy Spirit’s work of conforming believers to the holiness of Christ (see Romans 8:29; Colossians 3:10). (8)
My Life Application Study Bible’s take on it, “It is unclear what the white stones are or exactly what the name on each will be. Because they relate to the hidden manna, they may be symbols of the believer’s eternal nourishment or eternal life. The stones are significant because each will bear the new name of every person who truly believes in Christ. They are the evidence that person has been accepted by God and declared worthy to receive eternal life. A person’ name represented his or her character. God will give us a new name and a new heart.”
The Message to the Church in Thyatira.
Thyatira was a working person’s town, with many trade guilds for cloth making, dyeing, and pottery. Lydia, Paul’s first convert in Philippi, was a merchant from Thyatira (Acts 16:14). The city was basically secular, with no focus on any particular religion. (Life Appreciation Study Bible)
Thyatira was a lax, pagan church. [It was] idolatrous, seduced into corrupt beliefs and pagan rituals. The church was praised for love, faith, service, and endurance.
As noted by Amer when discussing the message to Pergamum, two of the same issues were addressed “to Thyatira: eating food offered to idols and participating in “fornication”. (See notes above regarding Pergamum for full quote).
Rev. 2:20b, “Your are permitting that woman—that Jezebel who calls herself a prophet–to lead my servants astray. She teaches them to commit sexual sin and to eat food offered to idols.” (NLT)
We do not know the true name of this woman who is nicknamed Jezebel in this verse. It is unlikely that her name was actually Jezebel. It wouldn’t be a name that parents would have wanted to bestow on a child at this time in history. Although I will point out here that in later centuries the Puritans used all the names from the Bible when naming their children. And as a genealogist, I have come across records listing women named Jezebel!
The Majority Text indicates Jezebel may have been the wife of the angel of the church. (10) What is meant here by the word angel is the pastor of the church, this Jezebel found in Jesus’ letter to the church of Thyatira may have been the wife of the church’s pastor. Whatever her role in the church, she was a woman who was extremely influential.
Christ describes her as persuasive in the Church, using her self-appointed position to lead Church members into sin. This was like the Jezebel of the Old Testament who influenced the people of Israel to corrupt themselves. [She] was promoting destructive heresies and leading many into moral compromise. Christ also says of this Jezebel, “I gave her time to repent of her sexual immorality, and she did not repent” (Revelation 2:21). This is like the impudent Jezebel of old who remained defiant of God to her gruesome death. This Jezebel [of Thyatira] meets a violent end like the Old Testament Jezebel, a lesson for the Christian not to allow her seductive influence in the Church. (9)
Jesus does give a message to those that have not followed her [this Jezebel]. He tells them to “hold tightly to what you have until I come.” (Rev. 2:25)
Interesting imagery:
“This is a message from the Son of God, whose eyes are like flames of fire, whose feet are like polished bronze:” – Revelation 2:18 (NLT)
Eyes like flames of fire and feet like polished bronze.
The church at Thyatira had been allowing Jezebel to promote her scriptural teaching in their midst (Rev. 2:20), but not the slightest detail had escaped the eyes of the Master. As discussed in Revelation 1:14, the eyes like a flame of fire indicate His omniscience and omnipresence. He is well aware of what is happening within the church at Thyatira, especially those things he opposes (Rev. 2:20).
Fine brass is translated from a word of unknown derivation (only occurring here and in Revelation Rev. 1:15) which probably denotes bright shining metal or perhaps its purity or hardness.
The imagery of both eyes and feet is that of impending judgement upon Jezebel and her children (Rev. 2:22-23). The judgement will serve as a witness of His omniscience: “All the churches shall know that I am He who searches the minds and hearts” (Rev. 2:23). (10)
His feet like polished bronze also shows purity and steadfastness of his steps and actions.
At the end of the message to Thyatira, Christ states that those who are victorious, and who obey him to the end, he will give them the morning star. (Rev, 2:26, 28b). In this passage he is encouraging them, for you only see the morning star when the long night is almost over and the dawn is approaching and very soon the bright light of the sun will dispel the darkness. It is a message, a promise, of HOPE! Jesus is called the Morning Star in Revelation 22:16. This is one of my favorite titles of Christ. “A morning star appears just before dawn, when the night is coldest and darkest. When the world is at its bleakest point. As the Messiah, he is the “bright morning star,” the light of salvation to all. (Life Application Study Bible)
It is a message that when Jesus returns the darkness (in every sense) will abate forever. For He is the “light of the world”.…and this light of God in all its holy brilliance “like lightning“ (Matt. 28:3) will blot out the darkness (and sin) forever.
The Message to the Church in Sardis.
The wealthy city of Sardis was actually in two locations. The older section of the city was on a mountain, and when its population outgrew the spot, a newer section was built in the valley below. (Life Application Study Bible)
Sardis was the capital of the Lydian empire and one of the greatest cities of the ancient world. Artemis was the main goddess of the city and the temple dedicated to her in Sardis was one of the seven largest Greek temples (more than double the size of the Parthenon). The gymnasium-bathhouse built in the center of the lower city in the 2nd century AD [was a] complex of over five acres… The synagogue of Sardis is notable for its size and location. It is one of the largest ancient synagogues excavated. (12)
Sardis was a dead church. It was a church in name only, without results and [was] spiritless. The church did receive praise for being effective and the few people who remained faithful believers were affirmed.
The problem in the Sardis church was not heresy but spiritual death. In spite of its reputation for being active, Sardis was infested with sin. Its deeds were evil, and its clothes soiled. [This church] looked so good on the outside but was so corrupt on the inside. (Life Application Study Bible)
The church needed to wake up and repent.
Interesting imagery:
“This is a message from the one who has the sevenfold Spirit of God and the seven stars.” – Revelation 3:1
The “sevenfold Spirit” is another name for the Holy Spirit. The seven stars are the messengers, or leaders, of the churches (see Rev. 2:1). (Life Application Study Bible)
The Message to the Church in Philadelphia.
Philadelphia was a favored church. It was a church that was exemplary, faithful to God’s word, and filled with his love. The church was praised for being faithful. It received no criticism.
“This church will be kept from the “hour of trial coming upon the whole empire” — probably a reference to God’s impending judgement against the whole Roman Empire rather than to general end-times tribulation (Rossing 2003; Richard 1995). That judgement or legal trial will happen in the Babylon vision of chapter 18.” (Amer, p 725)
Synagogue of Satan.
Philadelphia church message. “Look at those who belong to the synagogue of Satan, who claim to be Jews but are liars instead” (Rev. 3:9).
See my notes regarding this verse and the related verse in chapter 2 under the church in Smyrna.
He gives them a message that he is coming soon and to “hold on to what you have, so that no one will take away your crown” (Rev. 3:11) “…’come soon’ in this Greek context means something that will happen “quickly or suddenly,” not necessarily “a short time from now.” (Bibleref.com)
The Message to the Church in Boadicea.
Boadicea was the wealthiest of the seven cities, known for its banking industry, manufacture of wool, and a medical school that produced eye ointment. But the city had always had a problem with its water supply. At one time an aqueduct was built to bring water to the city from hot springs. But by the time the water reached the city, it was neither hot nor refreshingly cool–only lukewarm. The church had become as bland as the tepid water that came into the city. (Life Application Study Bible)
The church in Boadicea was a lukewarm church. [It was] self-indulgent, rich, and ostentatious, full of worldly pride. Boadicea received no praise.
“The Laodiceans receive the harshest critique. Prosperous Laodicean church members who may feel secure in their wealth do not “see” that their situation nauseates God. To persuade the church to repent of its complacency, John gives the image of Jesus knocking at the door and promising to eat with the church — possibly a reference to the Lord’s supper. ” (Amer, p 725)
“Although addressed to the Laodicean community corporately, the image of Jesus knocking at the door in 3:20 is frequently interpreted by mystics and pietists as the door of the individual’s heart. Hildegard of Bingen heard 3:20 as an invitation to the spiritual life. For St. John of the Cross (1542-1591), when Christ knocks on the soul’s door he brings the supper of “his own sweetness” (Wainwright, 203).” (Amer, p 726)
Revelation 4-5
Heavenly Throne Room, the Lamb, All Creations Worship.
Having completed the letters to the Seven Churches of Asia, John is called up to the throne room in heaven where he is given a vision of God the Father on His throne. (13)
“A voice summons John to “come up” to heaven. The vision takes place “in the spirit” (the same terminology as in 1:10; 17:3; 21:10). Many ancient apocalypses contain such visionary journeys involving travel into layers of heaven or time travel into the future. The seer returns from the transformative journey with an urgent message for readers, typically calling for repentance and faithfulness.” (Amer, p 727)
“John borrows imagery from the prophets Ezekiel and Isaiah to describe what he sees in heaven. The divine throne looks as the prophets saw it (Isa. 6:2; Ezek. 1:4-28), with concentric circles of worshipers including Ezekiel’s four mysterious living creatures. Too holy to be named, God is simply the “One seated on the throne.” Peals of lightening and thunder recall God’s theophany at Sinai. John adds a rainbow, connecting the throne to God’s covenant with Noah and all creation (Gen.9:20-21). (Amer, p 727)
“As political imagery, the heavenly throne-room scene evokes comparisons with the Roman emperor’s throne-room ceremonies (Aune 1983). …. With the image of the elders casting their crowns before God’s magnificent throne (4:10), John in effect trumps Roman court liturgies. The message is that only God, not the emperor or the empire, is worthy of worshipers’ allegiance.” (Amer, p 727-728)
“Since the second century (Irenaeus, Against Heresies 3.11.8), Christian tradition has associated the four living creatures with the four Evangelists, identified by Jerome (Preface to the Commentary on Matthew) as Matthew (the human); Mark (the lion); Luke (the ox); John (the eagle).” (Amer, p 728)
With chapter 4 we begin to see vivid imagery. “Like a jasper and a sardius (carnelian) stone in appearance” (4:3).
“Instead of describing a specific form or figure, John described emanations of glistening light in two colors: white (jasper may mean diamond) and red (sardius). (14)
The white (jasper/diamond) portrays God’s absolute purity and perfection. The carnelian was ruby red. It portrays God as our Redeemer. John also indicates that an emerald rainbow circled God’s throne. An emerald is green and symbolizes life. The emerald rainbow around God’s throne likely indicates that His promise of eternal life is guaranteed.” (Bibleref.com)
Another commentary by Trapp states, “A jasper having (as they say) a white circle round about it, representing the eternity of the Father. A sardine stone of a fleshy colour representing Jesus Christ, who took our flesh upon him. An emerald, being of a green colour, refreshing the eyes of them that look upon it, representing the Spirit, who is (as the rainbow) a token of fair weather, and is a comfortable refresher, wheresoever he cometh. [And there was a rainbow] Which is sign um gratiae et foederis, a sign of grace and of the covenant of mercy, which is always fresh and green about Christ’s throne of grace.” (15)
Who are the 24 elders seated in the twenty-four thrones that surround God?
Because there were 12 tribes in Israel in the Old Testament and 12 apostles in the New Testament, the 24 elders in this vision probably represent all the redeemed of God for all time (both before and after Christ’s death and resurrection). They symbolize all those — both Jews and Gentiles — who are now part of God’s family. The 24 show us that all the redeemed of the Lord are worshiping him. (Life Appreciation Study Bible)
In 4:5, “the flashes of lightning and the rumble of thunder” as in other places in Revelation, “are connected with significant events in heaven.” (Also see Exodus 19:16 and Psalm 77:18). The “sevenfold Spirit of God” is mentioned again. As previously stated, it is another name for the Holy Spirit. (Rev. 3:1). See also Zechariah 4:2-6, where seven lamps (like the seven torches here) are equated with the one Spirit. (Life Application Study Bible)
In 4:6 we see that in front of the throne was a shiny sea of glass, sparkling like crystal. (NLT).
Glass was very rare in New Testament time, and crystal-clear glass was virtually impossible to find (see 1 Corinthians 13:12). The “sea of glass” highlights both the magnificence and holiness of God. (Life Application Study Bible)
“A sea of glass mingled with fire” is found in Revelation 15:2.
The point of this chapter [chapter 4] is summed up in this verse: All creatures in heaven and earth will praise and honor God because he is the creator and sustainer of everything. (Life Application Study Bible)
The Lamb Opens the Scroll.
Chapter 5 continues the vision of the glimpse into heaven started in chapter 4.
“Revelation 3:5 introduces Jesus into the throne-room scene via a surprising plot development. The sealed scroll God holds must be opened. But no one can be found worthy to open the scroll’s seals and learn its secrets. John invites readers to “weep much” with him, employing pathos as part of his persuasive strategy (Maier, 57). One of the elders tells John not to weep because the Lion of the tribe of Judah, the Root of David, has conquered” (5:5). Two words — “lion” and “conquer” — lead us to expect a fierce animal to open the scroll,” (Amer, p 728)
The Messianic title Lion of the tribe of Judah comes from Genesis 49:9-10, Isaiah 31:4, and Hosea 11:10. The title Root of David comes from Isaiah 11:10 and is repeated in Revelation 22:16. (14)
“Yet John delivers an amazing surprise. In place of the expected lion comes a Lamb: “Then I saw. . . a Lamb standing as if it had been slaughtered” (5:6). The Greek word John uses for lamb (arnion) actually is a diminutive form [a little or delicate lamb], suggesting vulnerability.” This is one of a number of passages where hearing and seeing reveal two different and paradoxical dimensions of the same reality. John “hears” a Lion but “sees” a Lamb.” (Amer, p 728)
“The powerful image of Jesus as “the Lamb that was slaughtered” (Rev. 5:12) becomes the central symbol of Jesus for all of Revelation. . . . The Lamb of Revelation becomes the victor not by militaristic power and bloodshed but rather through being slaughtered. Evil has been conquered not by overwhelming force or violence, but by the Lamb’s victory on the cross.” (Amer, p 728)
In Revelation 5:6b the Lamb is shown as “having seven horns and seven eyes, which are the seven Spirits of God sent out into all the earth” (NLT). Even though the marks of His sacrifice were evident, the Lamb was not presented as an object of pity. He also bore the marks of omnipotence (seven horns) and omniscience (seven eyes).
Throughout the Scriptures, eyes suggest knowledge and wisdom, and horns suggest power. This Lamb has knowledge, wisdom, and power fulfilled perfectly: seven horns and seven eyes. The seven eyes of the LORD are a picture of omniscience drawn from the prophet Zechariah (Zechariah 4:10 and 3:9). (14)
“Which are the seven Spirits of God sent out into all the earth.” (Rev. 5:6b) The Holy Spirit is not only the Spirit of God (in the sense of being the “Spirit of the Father”), but also the Spirit of Christ (see Acts 16:7 and Romans 8:9).
“Singing breaks out in heaven for a second time when the Lamb is introduced. John of Patmos envisions a liturgy where animals and all creatures in heaven, on earth, and under the earth join in exuberant singing. The four living creatures and twenty-four elders now take up their harps to sing a “new song,” this time praising Jesus, the Lamb (Rev. 5:8-14).” (Amer, p 728)
Each elder has a harp and is holding golden bowls full of incense, which are the prayers of God’s people (Rev. 5:8b). “Golden bowls full of incense: In this we see how precious the prayers of the saints are to God. He regards them as a sweet-smelling incense, as if set in precious golden bowls. (14)
People from every nation are praising God before his throne. God’s message of salvation and eternal life is not limited to a specific culture, race, or country. Anyone who comes to God in repentance and faith is accepted by him and will be part of his Kingdom. (Life Appreciation Study Bible)
I would not really use Revelation with not-yet Christians. Possibly I could use it with those who have left the church or new Christians. But the concepts and symbolism have the potential to be misunderstood, and can even be scary to some people. The messages to the seven churches do include issues found today within churches and there is wisdom to be gleaned from those words. I would accept the challenge and discuss Revelation with anyone that brought it up themselves, but I would not choose it as my first choice. That being said, the broader message when putting it all together is one of hope, one of ultimate love, and even joy.
In closing, I will end with commentary of the last verses of Revelation 5:14.
Then [And] the four living creatures said, “Amen!” And the twenty-four elders fell down and worshiped the Lamb. (5:14) “who lives forever” (Rev. 4:11)
“Fell down and worshiped Him: The ancient Greek word for worshiped is literally “to prostrate” or “to lay before another in complete submission.” . . . The elders fell down to their knees, then laid themselves before Him who lives forever as an expression of their total submission and worship.
This is the eastern method of adoration: first, the person worshiping fell down on his knees; and then, bowing down touched the earth with his forehead. This latter act was prostration.” (Clarke)
Forever… worshiped Him who lives forever: The living God reigns eternally. The Caesars come and go, including those who persecute God’s people. But the Lord God lives forever and is ever worthy of our praise.” (14)
Amen! And again, I say, Amen!
☆ This blog post is from my work in Intro. to the New Testament course I took at Phillips Seminary. ☆

References:
☆ Required for the course was the use of Aymer and our choice of a study Bible. All verses were taken from the Life Application Study Bible and are from the New Living Translation:
- a. Aymer, Margaret (Ed.), Briggs Kittredge, Cynthia (Ed.), Sanchez, David A. (Ed.), (2014) Fortress Commentary on the Bible: The New Testament. Minneapolis, MN: Fortress Press.
- 1. b. Life Application Study Bible, New Living Translation, 2014, Wheaton, Il: Tyndale House Publishers.
- Lynch, Fr. Zechariah (2020, January 27) The Church of Ephesus: Praise and Rebuke. [Blog Post]. The Inkless Pen – I trod the earth and knew it was my tomb + A blog by Fr. Zechariah Lynch. Accessed January 23, 2021.
- Lazarus, David, The “Synagogue of Satan” Does this image in the New Testament describe the Jews? Judaism? What does it mean? Israel Today [website]. Accessed January 23, 2021.
- Ritenbaugh, Pastor John W., What is the ‘Synagogue of Satan’ (Revelation 2:9; 3:9)? Church of the Great God [Website]. Accessed January 23, 2021.
- Lehr, Paul. (2017, June 17) Revelation: Pergamum, A Two-Edged Sword. [Blog Post]. Publisher: Truth is in the Journey – God in a Nutshell. Accessed January 23, 2021.
- Got Questions. Your Questions. Biblical Answers. What was Jesus’ message to the church in Pergamum in Revelation? GotQuestions.org [Website]. Accessed January 23, 2021.
- Pope, Msgr. Charles. (2020, June 15) Of Hidden Manna and a Shining Stone: A Meditation on a Text From Revelation [Blog Post]. Community in Mission blog of the Archdiocese of Washington. Accessed January 23, 2021.
- Got Questions. Your Questions. Biblical Answers. Why is God going to give us a white stone with a new name? GotQuestions.org [Website]. Accessed January 23, 2021.
- United Church of God, Who Is Jezebel in Revelation 2 verse 20? Beyond Today – United Church of God [Website]. Accessed January 23, 2021.
- The Majority Text as represented by [Zane C. Hodges and Arthur L. Farstad], The Greek New Testament According To The Majority Text (Nashville, TN: Thomas Nelson Publishing, 1985).
- Bible Study Tools, Bible Commentary on Revelations 2:18. www.BibleStudyTools.com [Website]. Accessed January 23, 2021.
- BiblePlaces.com, Sardis. [Website]. Accessed January 23, 2021.
- Bible Study Tools, Bible Commentary on Revelations 4. www.BibleStudyTools.com [Website]. Accessed January 23, 2021.
- Guzik, Pastor David. Enduring Word – Free Bible Commentary [Website]. Accessed January 22, 2021, Enduring Word – Free Bible Commentary from Pastor David Guzik
- Trapp, John. “Commentary on Revelation 4”. John Trapp Complete Commentary. 1865-1868.
After a deep dive of study, I want to return to the heart, and I am sharing this video of one of my favorite renditions of the song In Christ Alone by Celtic Worship featuring Steph Macleod. ♡ ♡ ♡
If you use any information from my blog posts as a reference or source, please give credit and provide a link back to my work that you are referencing. Unless otherwise noted, my work is © Anna A. Kasper 2011-2026. All rights reserved. Thank you.








 Bubblegum Ice Cream became a favorite of mine when I was 13 years old. Memories come flooding back of


 (about 6″ x 9″ each)


